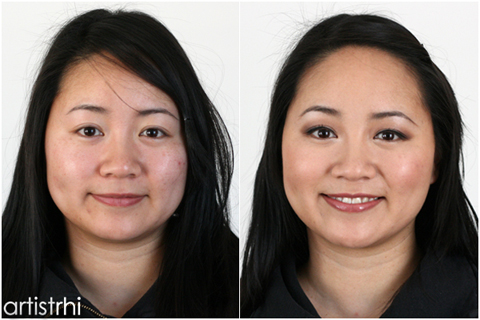
 Q: What do you recommend for cover-up? I'm looking for something light and not super expensive.
A: Perfect question. Spring is the time to lighten up when it comes to make-up, and considering the economic forecast of late, finding products that are affordable are definitely in season as well! (The recessionista chic movement cometh)!
If you have healthy skin and are just looking to add a light foundation to your make-up routine, opt for a tinted moisturizer. A tinted moisturizer will add a hint of colour and help to balance out the skin, creating a more even tone. It provides the most minimal coverage of all foundation types, while still producing a polished glow. Set the application with a light veil of powder. The powder will help to keep the product in place and tone down any excess shine.
Remember to still camouflage those “problem” areas (i.e. undereye circles and blemishes) with your trusted concealer; Even though ‘tis the season to go lighter with face make-up, it doesn’t mean you want to sacrifice that coverage where it counts!!
Recommended products:
Cover Girl Smoothers Tinted Moisture (best value)
Stila Tinted Moisturizer
Laura Mercier Tinted Moisturizer
ARTIST TIP: Use that liquid foundation you’ve been sporting for winter and add your face moistuizer to create your own homemade tinted moisturizer. Use approximately one part foundation and one moisturizer for the mixture (or add more or less moisturizer depending on how thin you want the consistency of the formula to be). Mix well and voila - your very own homemade tinted moisturizer…instantly! (and in true recessionista form!)
CREATIVE | Summer Cool with Christine Buijs
2009-04-28BEAUTY SHOT | Mary
2009-04-27CREATIVE | Deconstructive with Nadia Cheema
2009-04-25We’ve been talking make-up artist shop all week, so this week’s Q & A is also dedicated to the aspiring bridal make-up artists out there: Q: I'm a Vancouver based-freelance artist currently working at as a drugstore cosmetician. I recently graduated from a make-up school here. It sometimes seems feels like forever to get to where I want to be in my make-up career. I know everyone says patience is key and it is quite competitive, but I'd love to be doing more bridal. How did you go about getting into doing weddings? How did you put yourself out there?
A: In terms of getting involved in more bridal and in breaking into the industry – really and unfortunately, there's no hard and fast way to do so. To put it into perspective with, in my first year of bridal make-up, I started off with doing two weddings (plus miscellaneous appointments), the second year was four weddings (plus appointments), my third year was 15 and now I look forward to 30+ weddings per year!!
In terms of what got me to where I am today, it really boils down to making good first impressions, networking and word-of-mouth (which is how I got all my first few jobs!). What definitely helped my business take off this year was setting up a website, which allowed potential clients the ability to view examples of my work instantly.
When you're just starting your bridal portfolio off, you may not have professional images right away, but here are a couple of things to get you started on the right foot:
1. have a mock bridal photoshoot to add pictures to your portfolioFinally, remember to hang in there, work hard and do it for the love - the rest of it will fall into place.
Think about recruiting some friends as model brides, and co-ordinate with an aspiring photographer to get some photo examples of your work. Yes, they don't necessarily need to be actual "brides" in your photos, but once you work with more (and real) brides, you can replace these initial photos. Sometimes, it's just easier for clients to visualize the make-up this way.
2. research the bridal make-up artists in your area and find out if they need assistants
Even if it's just to watch brushes or do skin prep, you'll get a first-hand glimpse of how the pros do it, whether it be from a technical make-up or psychological customer service standpoint. Learn the little tips that will make the make-up last and save you time during the application appointments.
Hope this helps!
 In order to provide a more accurate review, I’ve been toting the ZUCA for MAC bag the past couple of weeks on various make-up jobs. For some jobs, I took the ZUCA bag directly from car to appointment location, while for other appointments, there was more walking involved. I have three other make-up bags that I usually switch between, but the ZUCA is a definite stand-out. Read on and see pictures (plus slideshow) below!
Lightweight and Easy to Transport
With my perpetually growing make-up kit, it’s been the best bag to house all these items yet. The lightweight bag facilitated the transport of my make-up from job to job, and the double set of wheels made it noticeably easier to carry up stairs without the usual fear of banging it and breaking fragile items within the kit.
Just Call Me Organized
The quad of clear-topped fabric stackable mini-cases is another of my favourite features of this pro bag. I love the idea of make-up being organized into trays (as my kit can get out of control without some sort of dividing system!), but the plastic trays of previous make-up bags tended to add to the weigh down, while at the same time, only allotted so much room for make-up. Further, once you packed that bag into the car and had to flip it onto its side, the unsecured make-up items ended up in random places within the bag.
Reduce Packing and Unpacking
The ZUCA mini-cases could be filled to the brim with make-up product and secured with the zip-top of the plastic case to minimize movement. The plastic trays are a good size to easily transfer from one bag to anotherl You could very well use of these clear trays as a personal make-up travel kit. When I’m on the job, I just pull out the mini-cases and place them on my make-up table to keep it organized. In other words, bye bye to a cyclical life of constantly packing and unpacking!
And for those of you who are curious - in all honesty, I’ve been too afraid to sit on this bag! It’s definitely a handy idea (since us MUAs are always on our feet), but since I want to maximize the life of the ZUCA, it’s probably also in my best interests that I refrain from parking my rear on it!
Have you tried the MAC for ZUCA bag? I want to know what you think!

View slideshow below or in full screen size.
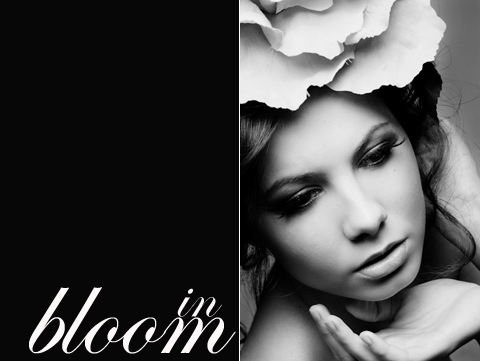
Here's a sneak peek of some of the photos from a recent shoot with Nadia. The theme of the shoot was "In Bloom" - just in time for spring! Be sure to enjoy the nice weather we'll be having this weekend in Toronto, and I'll have more pics of the shoot on www.artistrhi.com shortly!!
 The frequent posts have dwindled as of late, as my schedule has been amazingly stacked! Weddings, photoshoots, new products - tons of things to update here on the blog (just have to find the time to do it all!) I'm also taking a class in airbrushing and I can't wait to officially add it to the repertoire of services. The effects are amazing, and I know many of my clients have been inquiring about it.
For those of you inquiring (particularly my make-up artist readers), I'll post pics of the ZUCA MAC bag with all my stuff in it by early next week. The case is so handy and definitely worth the investment! But, of course, you can decide for yourself once you read the review :)
Lastly, I recently uploaded a new album to the artisthi Facebook group that gives a glimpse of the amazing people and all the fun stuff that goes on behind the scenes (along with further proof why I should remain behind the camera at all times ;) ) Enjoy!
Photo at right courtesy of Issha Marie
BEAUTY SHOT | Amanda
2009-04-13 Here are the before and after pics of a bridal trial with the lovely Amanda. Amanda wanted to play up more of a glam bride look, so we focused on a bold eye look paired with neutral lips to balance out the stronger eye make-up. The results were gorgeous - just like Amanda!
Q & A | Washing Your Make-up Brushes
2009-04-08 Q: Hi Rhia, I know this may sound silly that I don’t know this, but how often should I be washing my brushes?
A: Hardly a silly question (and the topic is totally in tune with yesterday’s post about spring cleaning!)! I actually get asked this question pretty frequently by clients. Quality brushes are quite the investment, and the problem is that many women aren’t taught how to maintain them properly…and not taking care of them properly can translate into the brushes not lasting as long as they should!
To clean your brushes, use a gentle brush shampoo* and massage it into the bristles to cleanse it throughly. Rinse well to clear the bristles of all shampoo suds. Blot the brush a couple of times on a papertowel to get rid of excess water and sculpt the brush back into shape. Hang over a counter and let air dry overnight.
*Instead of a brush shampoo, you can swap hair shampoo and even dish detergent (international celebrity make-up artist Laura Mercier does this!) to cleanse your brushes.
In terms of frequency for washing brushes, you’ll notice how brushes work and apply better the more you clean them. But let’s be realistic - in the life of the everyday woman, amongst your tall list of things to do daily, brush washing likely isn’t one of your top 10. As a general rule of thumb, you can wash the brushes you use for powders and eyeshadows after multiple uses (I would say at most after every 3 uses, but even that's pushing it!). For cream and liquid make-up products (such as concealers and foudations), you should ideally clean these everyday (or after each use). Again, the more often you clean your brushes, the better the results will be for your make-up application.
Keep these tips in mind to help ensure your quality brushes make you and your make-up look good – for a long time!
ARTIST TIP | Spring Cleaning Your Kit
2009-04-07 Each time a new season rolls around, it’s a great time to filter through your make-up kit to see which items need tossing and replacement. Many of us are guilty for holding onto make-up products past their prime. But for the sake of being sanitary and good to your skin, a little due diligence when it comes to cleaning out your kit is essential. Besides, any excuse to go make-up shopping always works for me!
Here are some telltale signs that your make-up kit is in need of a spring make-over:
1. products start smelling funky
i.e. mascara – Once opened, mascara has a life span of approximately 3 to 4 months. You’ll notice a funky smell once it starts going bad and the formula will be more prone to clumping. Toss.
2. products don’t glide on in the same manner they use to
i.e. powder eyeshadows – If you’re digging away at that eyeshadow and find the pigment just isn’t as potent as it used to be, it’s likely time to replace! Your eyelids will thank you once you start applying that new, creamy eyeshadow that just glides without having to pull at the delicate eye area !
3. liquid products have separated
i.e. foundations – No amount of shaking can get rid of that orange tinge that happens when your foundation has been kicking around for too long. Be good to your skin, and replace your foundation every 18-24 months (or sooner if it looks like it’s separating!).
4. you haven’t bought anything new in a couple of years
No-brainer. Go treat yourself to a fresh new look and properly ring in spring!
For more info on when it’s time to toss, see this post here. Happy Spring Cleaning!
ARTIST TIP: Waaait - don’t throw out everything just yet! Hold on to any MAC containers for the Back to MAC recycling program, where you can get a free lipstick (or equivalent) for recycling your old purchases!
PRODUCT REVIEW | ZUCA for MAC
2009-04-06Ever the fan of finding more efficient ways to haul around my make-up kit, last November at the CMS in Toronto, I made it a priority to scope out what other professional make-up artists use to tote around their make-up loot. One case that particularly caught my attention had the words “Zuca Pro” on it; I made a mental note to do some research on the brand.
ZUCA Pro
From what I saw online, the ZUCA Pro bag (pictured below) wasn’t designed specifically as a make-up artist train case, but it totally fit the bill of what I was looking for. Some features of the bag:
- plenty of room (case dimensions 19 3/8" x 15 1/2" x 13 1/8")
- easily mobile on wheels, with another set of wheels to aid in lugging it up stairs
- slim enough to fit in overhead compartments and through the aisles of most commercial aircraft
- contains stackable and removable fabric trays where you can organize make-up to your heart’s content
- sturdy frame that doubles as a chair. ZUCA Pro supports up to 300 lbs in weight so “you always have a seat”. (What will they think of next?!)
ZUCA for MAC
 Now, MAC has released their own ZUCA traincase that has all the features of a ZUCA Pro with MAC branding on the exterior. The case is a make-up artist's dream and comes complete with make-up artist friendly plush trays that have plastic see-through tops (differs from the original ZUCA Pro). The visibility allows for easy organizing and easy access of make-up items.
I just received the ZUCA for MAC case on Friday. I ordered it on Wednesday, and two business days later, I had it my possession (and without having to fork over extra dollars for duty tax!)
Pre-ZUCA, I’ve been going back and forth, packing and unpacking between the different cases I have, depending on the size of the job. I have this exciting feeling that this bag is going to simplify my life, and spare me the time packing and upacking. I’ll have to revisit this product review after a couple of times taking this case on the job.
For now, it’s pretty much love at first sight…
CREATIVE | Issha Marie's Behind the Scenes
2009-04-03Aside from pushing one's artistic boundaries, one of the best things about doing creatives is meeting great friends that share the same interests as you. I've worked with this super team (Nadia, Fabio, and Cisya) before and simply put - it's always just so much fun when they're around! Even through long hours, everyone puts forth their effort to achieve the ultimate goal of producing a gorgeous image (while still managing to have fun on set!). My work benefits greatly from all the efforts and talents of this super team (in other words - thanks guys!)
Check out some of the behind the scenes photos courtesy of Issha Marie, one of Nadia's assistants on the shoot and a talent behind the lens herself! See Issha's full write-up (and more behind the scenes pics) on the shoot here...just a sneak preview until the finished images are ready! Can't wait!
Here's my make-up area. Issha managed to make me look neat! (Other people beg to differ).


Photographer: Nadia Cheema
Photography Assistants: Collin Barrett and Issha Marie
Hair Stylist: Fabio Persico
Wardrobe Stylist: Cisya Paramita
Make-up Artist: Rhia Amio
BEAUTY SHOT | Agata
2009-04-02 Here are the before and after results of a wedding make-up trial with the lovely Agata. Agata's day is fast approaching this June and I'm so looking forward to it! What a gorgeous lady and a true delight to work with. I'll be sure to post the professional pics as soon as I can...stay tuned :)
Q & A | Saying I Dew to Make-up
2009-04-01Q: Hi Rhia, Thanks for all your tips on using shimmery make-up for my wedding day. I know you said a matte face will always photograph better, but I want a sheer, dewy look to my skin (and without it looking sweaty!). I find when I use all matte products, my skin looks dull and flat. Are there any alternate methods you can recommend so I can still achieve that dewy kind of look while maybe being not-so-dewy? I’d rather not have a flat powdered face for my wedding day photos!
A: Great question. The dewy look is definitely a gorgeous one – who doesn’t want a fresh and healthy glow on their Big Day (or everyday for that matter!)? But on a day like your wedding, it’s definitely a risky look to take on (after all, weddings don’t come around that often and we want to make sure the make-up is done right on such an important day!). In terms of combatting the flat make-up look, try these artist tips for a fresh finish that's a happy medium between a polished matte look and a healthy glow:
1. Moisturize before your make-up application.
Let the moisturizer sink in for at least 10 minutes, but ideally, let it set for 30 minutes before proceeding with your make-up application.
2. Use powder sparingly, paying particular attention to the oil-prone T-zone area.
Use a large powder brush and loose powder to set your initial foundation application. Pack a touch-up kit for later in the day with oil blotting tissues and a pressed powder. Use the tissues to absorb excess oil, and then dab on pressed powder to refresh your look (the pressed powder will cause less of a mess than loose powder, which is good because you'll have your dress on at this point!) 3. If you find the finished look is still too matte-looking for your liking, try using MAC's Fix+.
Hold the bottle an arm's length away from your face and spray a couple of times to add a light mist of moisture to the face. Fix+ is infused with vitamins and minerals that help calm your skin, add radiance and finish your make-up! Lastly, powder down the T-zone once more to make sure this oil-prone zone is in check!
Hope this helps! All the best for your wedding day!

