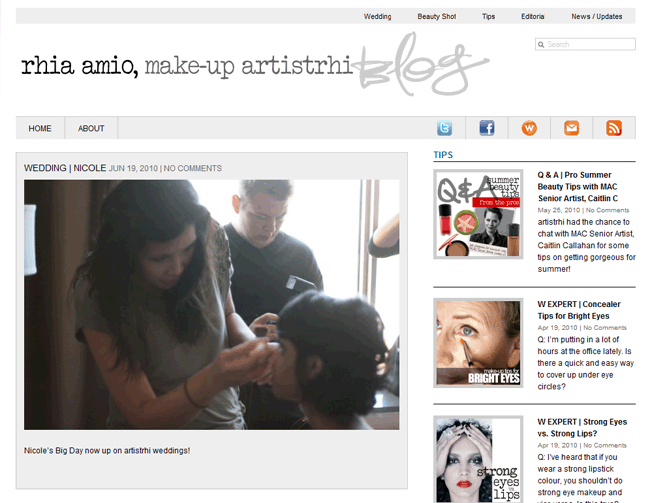
Q: How many times can I re-use false eyelashes?
A: False eyelashes can be re-used a good 2-3 times before it's definitely time to chuck them. To maximize the wear out of your falsies, be sure to clean them gently, but thoroughly, after each use. Keep the container that the false lashes come in, and store the falsies back on the rounded center to retain their curved shape. Once the applied falsies start looking too crusty or crunchy, it's time to invest in a new pair. Fortunately, many quality falsies don't cost an arm and a leg! Brands like Ardell, Revlon and Quo (available at Shoppers Drug Mart in Canada) all offer great looking falsies for under $7...and $7 for such a glamorous end result is definitely a steal to me!
Q: I have trouble with applying darker eyeshadows. Do you have any tips?
A: Typically when it comes to applying eyeshadow, the make-up products and tools you're using can really make or break the look. Stick to high-pigmented shadows that glide on smooth, rather than chalky (essentially, you shouldn't have to dig too hard at the colour for it to apply with intensity!). Most eyeshadows by prestige brands are worth the investment - they blend easier, last longer and you'll end up using even less because the formula is so pigmented. Try Make-up Forever or MAC eyeshadows in particular - both lines offer an extensive selection of beautifully pigmented colours.
When it comes to darker eyeshadows, blending with the right brushes is key to achieving a professional look. I recommend at least two (I would recommend more if I could!) brushes for a smoky eye look:
1. a crease/pencil tip brush (i.e. MAC 219)
2. a blender brush (i.e. MAC 222)
Use the crease brush to precisely apply the darkest colour in the hollow of the eye down towards to the lashline. Use the blender brush to soften the look; blend atop the area you just applied eyeshadow too by using a back and forth motion. Apply more eyeshadow as desired, but always be sure to follow with blending. You want the finished look to be diffused - you don't want to see where the line starts or stops!
More smoky eye tips: Save your concealer application until the very end of your routine. When using darker colours, there's always the potential for flakes of shadow to stray from where you intended them to be. Dust some translucent powder underneath the eyes (or place a tissue beneath the eye as you apply eyeshadow) to catch any flailing bits that can lead to a smudgy mess! Once your eyeshadow application is done, then it's safe to apply your concealer as normal and top it off with powder to set it.
For more smoky eye tips, get the look here (just in time for the holidays!)
Thanks M of Australia for these questions - hope these help!! :)
If you have a make-up related question you'd like to ask, drop me an email: rhia[at]artistrhi[dot]com. I look forward to hearing from you!
Q & A | All About Eyes
2009-11-27NOTE | artistrhi news and i like...
2009-11-24
I like....how glam my readers are!
With this latest Marcelle Ultra Glam contest I've been gaining some insight into the lives of my totally glamorous readers. I'm also ecstatic to hear how tips and reviews on the artistrhi blog help to keep you looking and feeling fab. Thanks guys and good luck!
Have you entered yet? Contest closes this Friday! See more details here and the review of what you'll get here.
I like...Nadia Cheema Photography's new site!
Nadia Cheema is a talented fashion and portrait photographer I frequently work with, and also a dear friend. She recently re-launched her website to include a new format, where the pics can be viewed in super high resolution. It makes my jaw drop to see pretty pictures that big! Check out her new site...and you'll see some familiar pics! :) (Yes, slightly biased I know!)
I like...Claudia Hung, Editorial and Wedding Photographer!
Claudia Hung is a talented editorial and wedding photographer that I'm fortunate to work with and call a friend as well! Claud helped awkward me take the shots at left for a very exciting gig I have coming up! More details to come soon :)
Ok, so maybe it's more like "I love" all of the above.... :)
artistrhi weddings update! It's been an absolutely beautiful November for Toronto weddings and gorgeous brides! I had the honour of working with the lovely Maricar for her wedding during the first week of this month. Here's a recap of some of my fave behind the scenes shots with the bride and her party:
CREATIVE | Denny Lee Photography
2009-11-23
Check out the Fashion section of rhiaamio.com for a shoot with photography by Denny Lee and styling by Ashley Storm. I had a great time on set with these folks and with our striking models! I hope you enjoy the pics, as I definitely enjoyed helping to make them! :)
credits
Photography: Denny Lee (http://www.dennyleephotography.com)
Make-up/Hair: Rhia Amio (http://www.rhiaamio.com)
Styling: Ashley Storm
I love doing shoots with Nadia Cheema aka Nads - the creative juices get to flow and we just understand each other! She's a truly talented photographer, and I'm happy to call her a friend as well.
Ok, getting back to our latest collabo! The theme behind this shoot was Grimm's Fairy Tales. Now I don't know if you've ever read the original Grimm's tales, but the stories are quite the opposite of the Disney-everyone-lives-happily-ever-after versions. Just saying - something to think about....and now, here's something to look at - check out the Snow White set in the Fashion section of rhiaamio.com! :)
side note:
We did 2 other Grimm's inspired looks that long, but awesome, day with Teama Cheema. I think my favourite look of the day was Rapunzel. I'll be posting the rest as soon as I get them...stay tuned! :)
NOTE | On set with Mathew Wilson
2009-11-21Rhia Amio
647-300-7442
http://www.artistrhi.com
http://artistrhi.blogspot.com
Sent from my BlackBerry device on the Rogers Wireless Network
Pro photos from Linda's wedding have now been added to artistrhi.com! The stunning images are courtesy of Chris Luk Photography - be sure to check out his site too for tons more wedding inspiration and images from Linda and Shane's Big Day!
See more of Linda here.
Photo credit: http://www.chrisluk.com
BEAUTY SHOT | Mary
2009-11-19
So now that 2009 wedding season is pretty much wrapped up (still have about 3 more weddings to post!), it's time to get acquainted with lovely 2010 brides!! Mary is one of the brides I'm excited to be working with next year...what an absolutely gorgeous and sweet lady! Here's her before and after as we prepped for her engagement shoot. As you can see, I just added the finishing touches - the rest is all Mary!
See you in March, Mary! wahoooo :)
On a side note, 2010 is 50% booked for brides. If you're still looking for a make-up artist, feel free to send an email to rhia[at]artistrhi[dot]com to discuss!
Q & A | Concealing a Red Nose
2009-11-18
Q: hi Rhia,
Hoping you can help...the tip of my nose and the skin right below it are really prone to turning red, and the cold weather (and cold/flu season) isn't helping! Are there any products you can recommend to help hide the redness? I have heard that using green concealer works?
A: Tell me about it - I get a case of "Rudolph" nose during this colder time of the year too! Fortunately, we have make-up on our side to help us camouflage the redness we get from irritation. :)
First off, with all the nose wiping and blowing, make sure you moisturize the tips of your nose well. Treat yourself to at least 2-ply tissue...and hey spoil yourself with 3-ply if you're blowing your nose constantly! Softer tissue will help to reduce the irritation that comes from the constant friction of you rubbing your nose.
Now in terms of using green concealer, I always advise clients to use a light hand, as it's one of those tricky colours to work with. The use of green concealer is based on colour wheel theory: green is the opposite colour of red so once applied, green helps to neutralize and reduce redness. In the past, I have used green concealer to combat redness whether it be around the nose, for a rash or for a pimple! You do have to be careful to blend it properly....otherwise the green concealer can leave a pale white-green cast on the area applied...and you may end up drawing unwanted attention to that same area you're trying to hide! An easier and more user-friendly colour to work with is a creamy yellow concealer. Apply the yellow in the same manner as you would with the green concealer (start off light because it's always easier to add more!).
How to apply:
1. Distribute the colour correcting concealer over the redness and blend.
2. Apply your skin-tone matching concealer and/or foundation atop.
3. Set the application with a dusting of powder.
4. Pack the concealer in your make-up kit, as you may need to touch up the area once you blow your nose again.
Colour Correctors to try:
Benefit You're Bluffing Concealer Wand (approx $22)
The tube applicator makes it easy to lightly apply the concealer where needed. The formula glides and disguises redness well.
Physicians Formula Gentle Cover Concealer Stick (approx $8)
Physicians Formula concealer comes in Green, Yellow or Pale Yellow. The formula glides on smooth, is non-drying and blends easily into the skin.
Marcelle Universal Concealer Palette ($16)
Use the yellow of this palette to colour correct and then blend with one (or a mix of the skin tone colours). I love this palette - see my review here (oh yeah, and enter the contest to win one!)
Thanks for the great question - especially at this time of the year!
If you have a make-up related question you'd like to ask, drop me an email: rhia[at]artistrhi[dot]com. I look forward to hearing from you!
WEDDING | Linda
2009-11-17
You may remember Linda from our trial way back in May (just as wedding season was really getting underway). It's hard to believe her beautiful Big Day has already come and gone!! We started Linda's make-up prep early on a Saturday morning (we're talking 6:30 AM!) so you'll have to pardon the quality of the shots. The sun wasn't up as yet and the flash slightly washed out the colour of the shots. Despite the early morning start, Linda and her gorgeous bridesmaids were such troopers! Thanks for the fun morning ladies and congratulations Linda! :)
Check out the rest of the pics here or by clicking the pic above!


